Add Virtual Network Connectivity Requirements
Virtual Network connectivity is achieved using VLAN or Subnet services, which create virtual networks. VLAN-based virtual networks enable connections between private cloud Apps, such as vCenter and OpenStack, and support both peer-to-peer and many-to-many connections, and can be used to connect Apps and/or physical resources. Subnet-based networks are used to connect AWS EC2 or Azure Apps to each other. They do this by creating, for every subnet service in the sandbox, a dedicated subnet in the AWS EC2/Azure cloud that allows connecting multiple Apps of the same cloud provider to each other.
Adding peer-to-peer connectivity route
There are two peer-to-peer connectivity types, physical (L1-based) and network layer (L2 or subnet network-based). The network layer connectivity type uses a Connector route, while for physical layer connections, a Route connection type is used and CloudShell selects the L1 resources that are needed to resolve each connection.
Note: For P2P connections between two AWS EC2 or Azure Apps, CloudShell creates a subnet with 16 IPs.
To add peer-to-peer connectivity:
-
In the diagram, hover over an endpoint. From the context menu, select the Create Connection option.
Admins can customize the peer-to-peer connections in a sandbox by adding the P2P VLAN Default service to the diagram and modifying its settings as appropriate.
-
Click a target App or resource to connect.
An indication message is displayed.

If at least one of the endpoints is an App, a Connector route is created. However, if both endpoints are physical resources but you want to connect them using an L2-based connection, in the Resource Connections dialog box, you will need to select Connector, click the source and target endpoint ports, click Add and then click Save.
-
A Connector route between the endpoints is created.
- Blueprint designers can optionally configure the connectivity requirement's settings.
Adding many-to-many connectivity
This method enables you to connect multiple endpoints to each other by linking them to the same Virtual Network service in the blueprint. In a sandbox, users can select to connect or disconnect specific routes that are connected to the VLAN service or to connect all routes from the VLAN service's Commands pane.
To add many-to-many connectivity:
-
In the diagram, add the appropriate VLAN or Subnet service to the canvas.
Use the VLAN Auto service to have CloudShell automatically select the VLAN ID, use the VLAN Manual service to specify a particular VLAN ID to use, or use the Subnet service to create a new subnet in the AWS EC2 or Azure cloud, and connect AWS EC2/Azure Apps to it.
Tip: Before you add a Subnet service, read through Subnet Connectivity - Points to Consider.
-
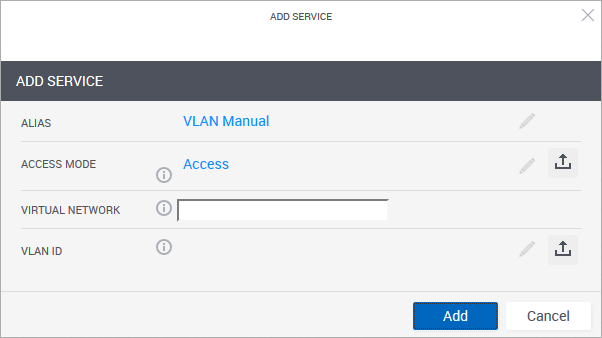
If the Add Service dialog box is displayed, configure the parameters available for the service you added. Depending on the service, certain parameters may be read only.

The parameters are:
- Alias: display name for the service in the diagram
- Access Mode: (For VLAN services) Interface VLAN mode
- Virtual Network: (For VLAN services) (Read only) Allocated virtual network. The value is displayed only after the virtual network is selected and activated.
- VLAN ID: (For VLAN services) VLAN ID to use for the connection
- Public: (For Subnet services) Determine if the Subnet is connected to the internet.
-
Subnet Size: (For Subnet services) Select the subnet size of this service (block size of the subnet CIDR). Possible values: 16, 32, 64, 128 (corresponding to block sizes of /28, /27, /26 and /25).
Notes:- Since each cloud provider has a few IPs in each subnet reserved for networking services, the actual number of Apps that can be added to a subnet is lower than the number set in the subnet size attribute. Currently in AWS, 5 IPs are reserved.
- When adding multiple VLAN or subnet services, keep in mind the total maximum number of IPs per sandbox is 255.
- Click Add.
- Drag an App or resource to the canvas.
- Hover over it. From the context menu, select the Create Connection option.
-
Click the service.
An indication message is displayed.

A Connector route between the endpoints is created.

- Repeat to link additional Apps or resources to the service.
- Blueprint designers can optionally configure the connectivity requirement's settings for the endpoints.
