Create a Management VPC and Networks using CloudFormation
The CloudFormation service creates the Management VPC, subnet within the Management VPC, and then launches three AWS EC2 instances, two with an Execution Server and one with QualiX. The Execution Servers then need to be configured to access the Quali Server.
To create a Management VPC and the required networks:
- Make sure you have the information required for this process, as listed in Required Permissions for AWS Deployment.
-
As an admin, open your AWS account, and click Management Tools
>CloudFormation.
- Click the Create Stack button.
-
In the Select Template page, select the Specify an Amazon S3 template URL option and enter the template URL. The template URLs are provided in Quali's Download Center for each CloudShell release version.
- 0_Main_EX.json – for external deployment, where the QualiX instance has a Public IP associated with it
- 0_Main.json – for internal deployment, where the QualiX instance has only a Private IP associated with it. The Private IP is accessible from the networks that are connected to the Management VPC (such as the network in which the Quali Server resides).
-
0_Main_EX_No_VPN.json - for deployments in which CloudShell Server is also installed on AWS.
 More...
Note: This template deploys an empty Windows Server 2012 R2 64-bit instance called cloudshell-server on which you will need to install and configure Quali Server. Also, since CloudShell's Quali Server is to be installed on AWS, there's no need for a VPN connection.
To install and configure Quali Server:
- In the instance's security group, set a rule to allow inbound RDP connections over IPv4- see this article for official instructions.
- Log in to the Windows Server 2016 instance using Remote Desktop. To get the password, in the EC2 Dashboard, right-click the instance and select Connect, click Get Windows Password, browse to the keypair file you used in CloudFormation and select Decrypt.
- On the instance, install the CloudShell suite that matches the CloudFormation template you are using. Make sure you install an Execution Server on this machine and configure it to run all sandbox orchestration scripts. For details, see Controlling execution server selection for blueprint commands.
- Stop and start the es-shells and es-commands instances to allow the execution servers to register Quali Server.
-
If for whatever reason they didn't register, manually connect each Execution Server to the CloudShell Server, as explained in Connecting the Execution Server to Quali Server.
- In CloudShell Portal, in the Manage dashboard, open the Execution Servers>Servers page and make sure the two execution servers registered successfully and are online.
- Click Next.
-
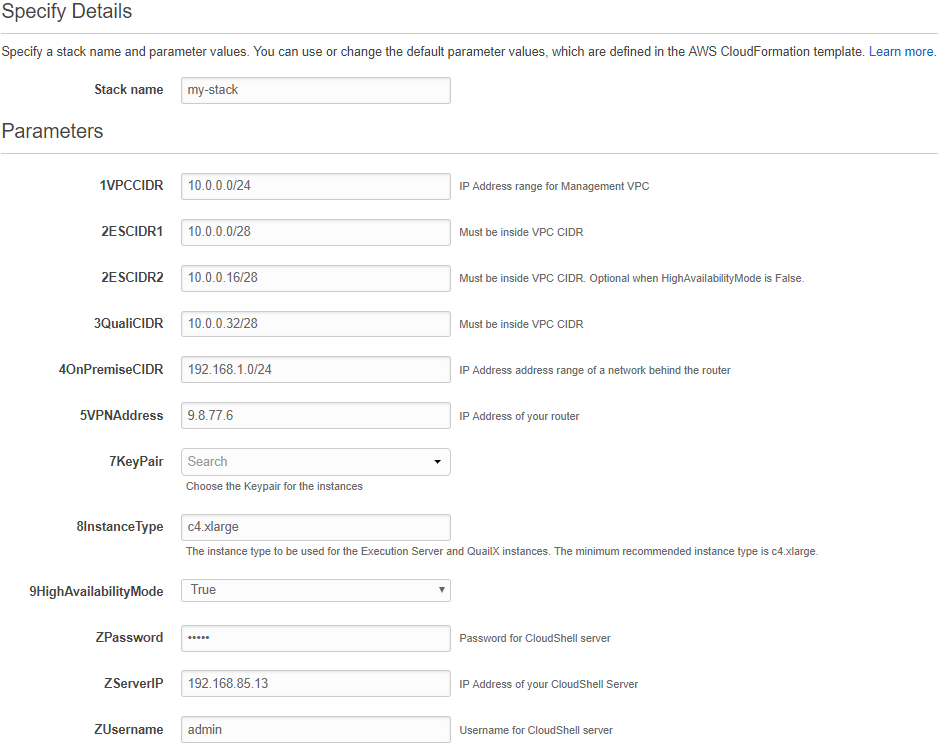
In the Specify Details page, enter a Stack name and fill in the installation parameters.
VPC CIDR The IP range (in CIDR notation) to be used for the Management VPC. Select a class C CIDR (/24).
Note: The Management VPC will be later connected via VPN with your on-premise network so select an IP range that does not conflict with your other networks.
ES CIDR The IP range (in CIDR notation) to be used for the Execution Server subnet. Make sure the IP range is within the VPC IP range and does not conflict with the other subnets in the Management VPC (the NAT and Qualix subnets). NAT CIDR The IP range (in CIDR notation) to be used for the NAT subnet. Make sure the IP range is within the VPC IP range and does not conflict with the other subnets in the Management VPC (the QualiX and Execution Server subnets). Quali CIDR The IP range (in CIDR notation) to be used for the QualiX Server subnets. Make sure the IP range is within the VPC IP range and does not conflict with the other subnets in the Management VPC (the NAT and Execution Server subnets). On Premise CIDR The IP range (in CIDR notation) of the private network in which the Quali Server resides (outside of the management VPC). VPN Address The public IP address of the router on the network in which Quali Server resides. Key Pair The KeyPair to use for all instances that will be created in the Management VPC. InstanceType The instance type to be used for the Execution Server and QuailX instances. The minimum recommended instance type is c4.large. HighAvailabilityMode Use this option if you wish to set up AWS integration in High Availability mode. In this mode, the integration will create two additional execution servers, es-shells-b and es-commands-b that will be used for failover scenarios.
Important: Before enabling High Availability mode, please take into account that the failover instances will incur additional costs.
Configure the Execution Servers (created by the CloudFormation process) to work with the Quali Server: Username The CloudShell admin user Password The CloudShell admin password Server IP The IP Address of the Quali Server For example:
- Click Next.
-
In the Options page, click Next.
- In the Review page, at the bottom, select the I acknowledge that AWS CloudFormation might create IAM resources check box.
-
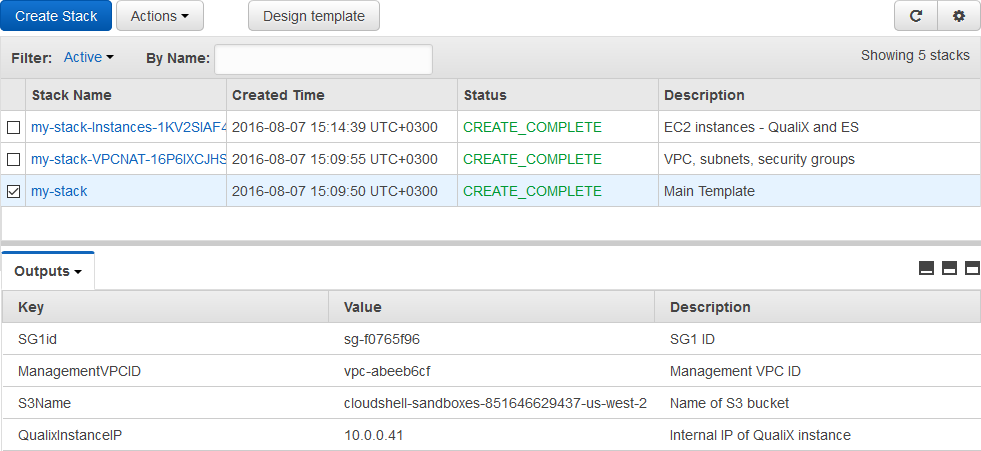
Click Create.
The stack is created.
Tip: If stack creation fails with the below subscription error, make sure to subscribe to the CentOS 7 Marketplace image and try again.

Note the Outputs tab at the bottom of the page. You will need this information when you Add an AWS EC2 Cloud Provider Resource.
-
In the VPC Dashboard, open VPN Connections to see the VPN connection settings:

- Next, Connect the Management VPC to Quali Server.