Blueprint Workspace
The workspace enables you to create and configure your blueprint. This includes adding available resources, Apps, services and connectivity requirements, and configuring their settings for the blueprint. You can also view or update the blueprint's properties (depending on your permissions).
In this article:
Navigating the blueprint workspace
Reserve a blueprint from the blueprint workspace
Request approval to reserve a blueprint
Navigating the blueprint workspace
In the image below, hover over an area or option to learn more about it, or use the table that follows.
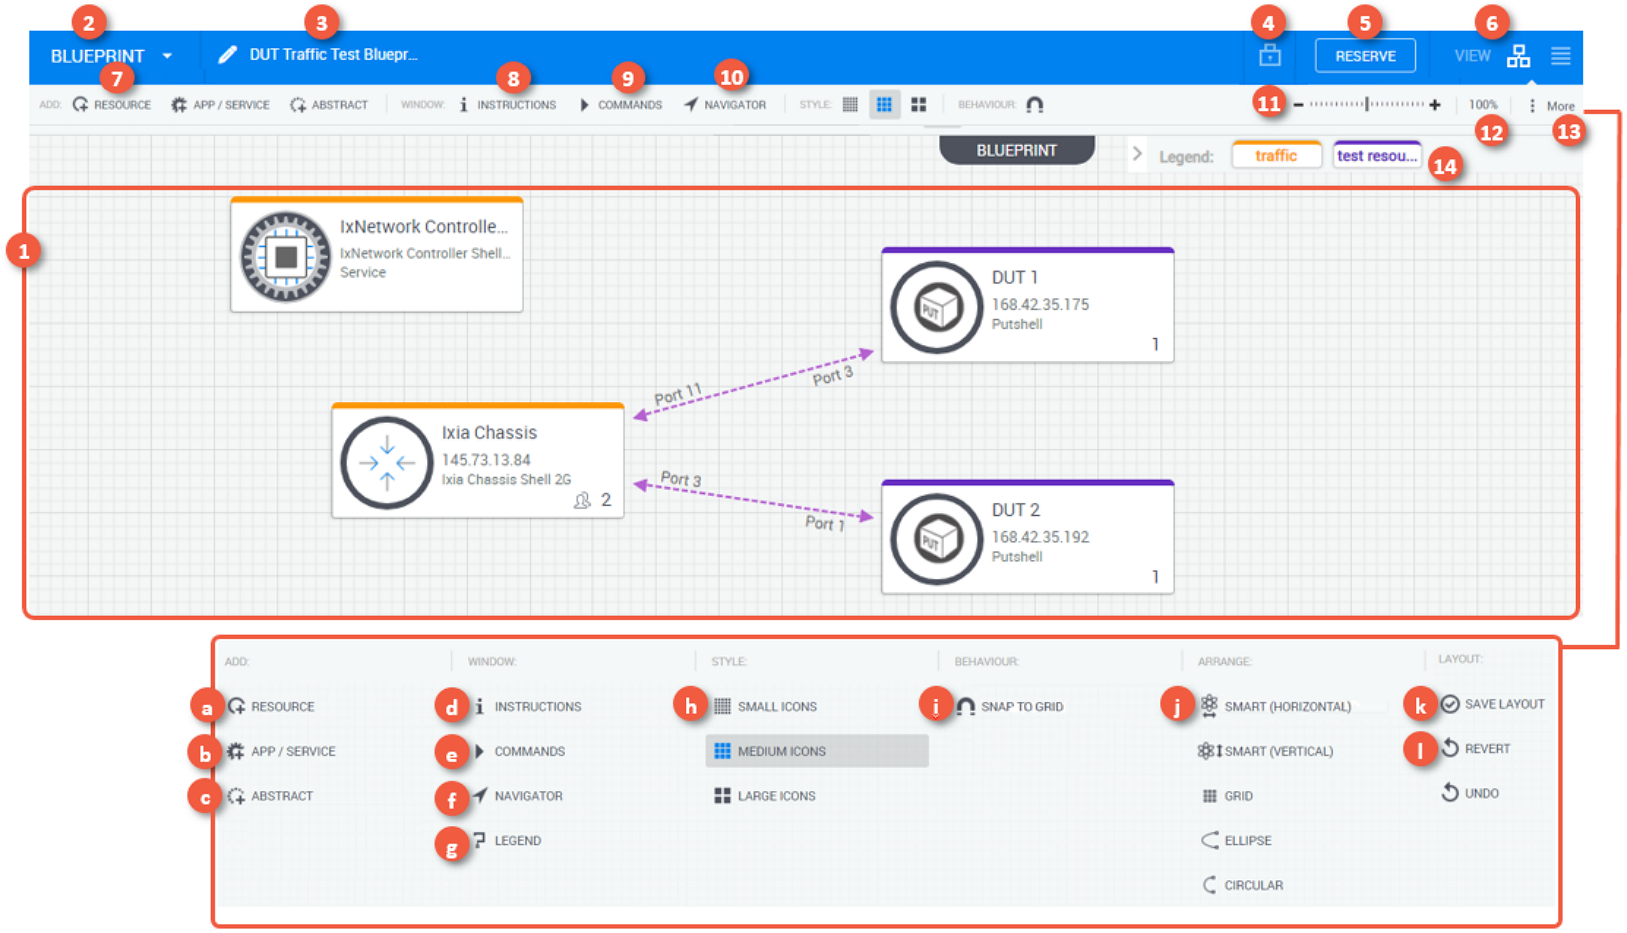
| 1 | The canvas displays the different resources, services and Apps in the blueprint and enables you to perform different actions on the blueprint and its elements. | ||||||||||||||||||||||||
| 2 | The Blueprint menu enables you to view the blueprint's properties, save the blueprint as a template and export it as a package. | ||||||||||||||||||||||||
| 3 | The blueprint's display name. Click the name to change. | ||||||||||||||||||||||||
| 4 | The blueprint's current privacy setting. Click the button to change. | ||||||||||||||||||||||||
| 5 |
Click to reserve the blueprint. Other users in this domain can see and access public blueprints while private blueprints are accessible only to you and the blueprint's permitted users, if you defined any. Note: This option is not available in blueprints defined as "view-only." |
||||||||||||||||||||||||
| 6 | The workspace view mode. Diagram view provides a graphical representation of the blueprint. List view displays the blueprint's elements in a list. You can filter the list using the search field and sort the list by clicking the desired column name. | ||||||||||||||||||||||||
| 7 | Click the Resource, App / Service, or Abstract button to add the suitable resource to your blueprint. | ||||||||||||||||||||||||
| 8 | Review the blueprint’s instructions. This option is available only if the blueprint has instructions. See Review Sandbox Instructions. | ||||||||||||||||||||||||
| 9 | Review the blueprint's commands. CloudShell's blueprint template includes preconfigured setup and teardown commands. See Blueprint commands. | ||||||||||||||||||||||||
| 10 | Show the diagram in a mini-map on the workspace. You can drag the map to change the view in the workspace. | ||||||||||||||||||||||||
| 11 | Zoom in or out of the workspace. | ||||||||||||||||||||||||
| 12 | Enter the zoom percentage. Default is 100%. | ||||||||||||||||||||||||
| 13 |
Displays all the blueprint workspace tools and options in a pane.
|
||||||||||||||||||||||||
| 14 | Displays labels that are currently being used in the diagram. See Labels in Blueprints. |
Blueprint Diagram view
Diagram view is the default view for the blueprint. It enables you to add and arrange elements in your blueprint, such as resources and Apps, define connectivity requirements between these elements, and set the blueprint's properties, including description, image, blueprint categories, orchestration, instructions and inputs.
In Diagram view you can also view blueprint and resource commands.
Tip: To move or delete multiple elements at once, hold down the [Ctrl] key, select the elements and perform the suitable action.
Blueprint List view
List view displays the blueprint's elements and their sub-resources in a list.
For more information, see Blueprint List View.
Reserve a blueprint from the blueprint workspace
When reserving a blueprint, you can define certain properties of the sandbox and may need to provide information for resource provisioning and automation processes.
If there's a resource or scheduling conflict, CloudShell will offer available time slots for the sandbox. For additional information about sandboxes and reservation conflicts, see Creating Sandboxes.
Note: Blueprints of type ‘view’ cannot be reserved.
To create an immediate or future sandbox:
-
In the Blueprint Catalog, on the required blueprint tile, click Reserve. Alternatively, in the blueprint workspace, click the Reserve button.
The Reserve dialog box is displayed.
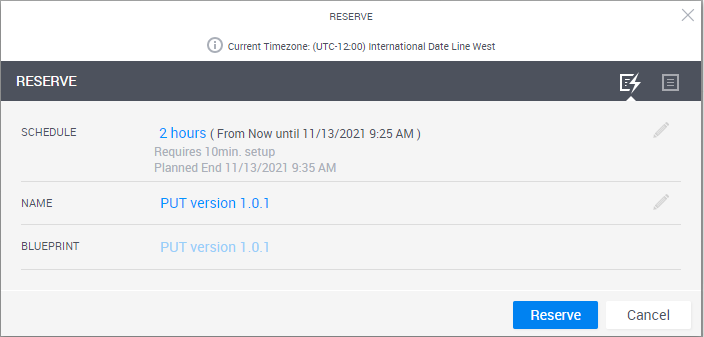
Tip: The timezone for the sandbox is indicated in the title of the Reserve dialog box.
-
If the blueprint is defined as a persistent blueprint, select the Sandbox Type you want to deploy:
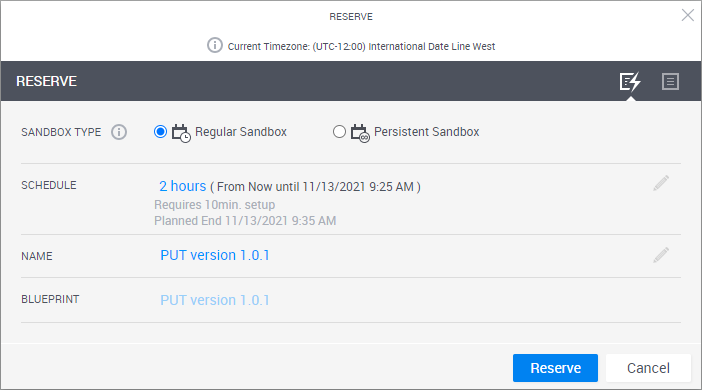
- Regular Sandbox to spin up a time-limited sandbox
- Persistent Sandbox to deploy a persistent sandbox with no end time. For details, see Persistent Sandboxes Overview.
-
In the Schedule field, you can set the required sandbox duration or specify the explicit start and/or end time. Use the Calendar button to set future dates.
- Most of the scheduling options are disabled for persistent blueprints.
- For non-persistent sandboxes, if a maximum duration was set for the sandbox, the user will not be able to reserve for a duration beyond this setting.
-
(Unavailable for persistent blueprints) To have this sandbox repeat in a series, click Add Recurrence. If this option is missing, the admin needs to enable it using the
EnableRecurringReservationkey.The Recurrence page is displayed.
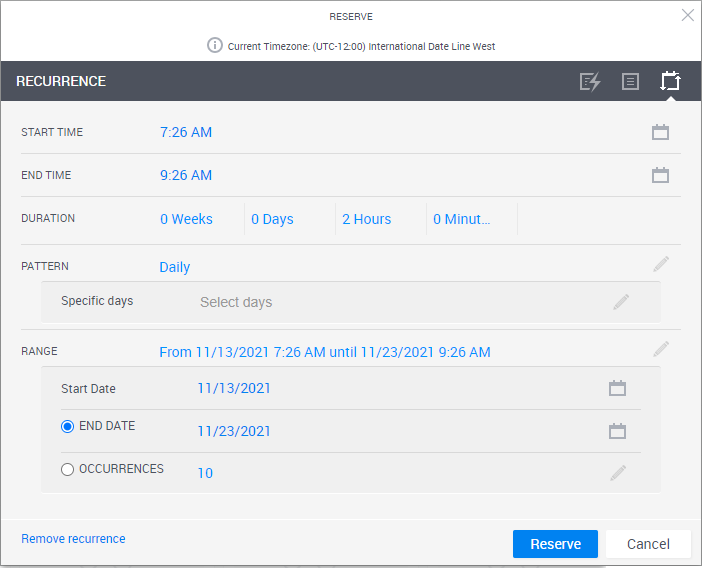
- To have the sandbox repeat on specific days, click the Pattern field and either select the days or select Daily to have the sandbox repeat on all days of the week.
- In the Range field, define the period in which the sandbox will repeat.
-
Optionally, change the Name of the sandbox. By default, the new sandbox name is the blueprint name.
Note: The sandbox’s name has a limit of 60 characters.
- In the Blueprint field, you can see the blueprint on which the sandbox is based.
-
To specify additional options, click the Advanced Form
 button.
The advanced form enables you to configure the email notifications, permissions and other options.
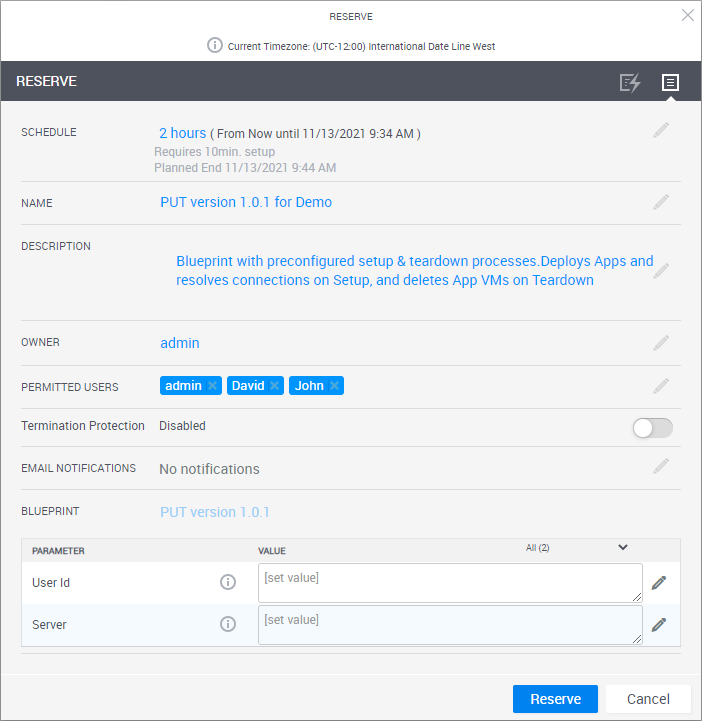
- Optionally, enter a Description. Otherwise, the description of the sandbox will default to the blueprint description.
-
To define an owner for the sandbox, click the Owner and select the required user. By default, the user who initiated the scheduling action is set as the sandbox owner.
-
Instead of changing the owner of the sandbox, you can permit additional users to use the sandbox. Click the Permitted Users section and select the users you wish to add.
- To prevent users from ending the sandbox before its scheduled end time, enable Termination Protection. This option ensures your sandbox isn't ended accidentally or prematurely. And when you are ready to manually end the sandbox, disable the option in the sandbox's properties window and then end it.
-
You can configure CloudShell to send email notifications to the owner of the sandbox and permitted users.
Note: This capability requires the administrator to activate the email notifications feature using the
ReservationEmailconfiguration keys.-
Click the Email Notifications field.
The Email Notifications area expands.
-
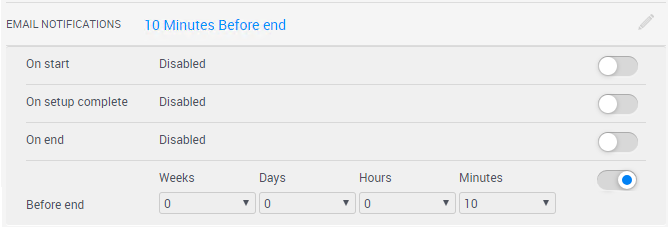
Configure the email notification settings.
- On start - Sends notification as the sandbox starts.
- On setup complete - Sends notification when the sandbox setup completes.
-
Before end - (Unavailable for persistent blueprints) Sends notification before the Teardown process begins. The exact time is decided by the user.
Note: By default, it is not possible to launch a sandbox that has a shorter duration than the Before end period. However, your admin can enable this capability using the
ReservationEmail.VerifyNotificationBeforeEndLongerThanDurationconfiguration key. - On end - Sends when the sandbox ends.
-
-
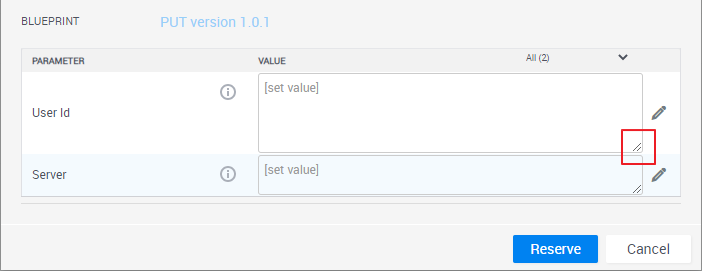
If the blueprint has inputs (global inputs, published abstract resource or service inputs), you will be asked to provide them.
Tip: To expand the value area, click and drag down the icon in the bottom right corner of the frame.
-
Click Reserve.
The sandbox is being reserved.
If you are reserving a blueprint that has the Default Sandbox Setup script, the script runs, and an indication next to the sandbox state informs you of its progress. More...
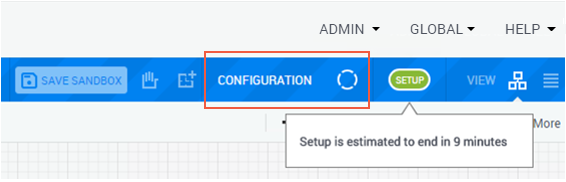
Note that during the Setup process, the sandbox is locked in CloudShell Portal and cannot be modified - see Unlocking sandboxes for use during the Setup process.
The default setup process has 4 stages:-
Preparation - Prepare network connections for the sandbox's Apps and any additional custom preparations.
Note: This stage is not used by default, but can be used for custom code executions that need to run before the setup process.
- Provisioning - This is the main stage of the setup process. In this stage, CloudShell locks unshared resources for the duration of the sandbox, deploys the sandbox's Apps and prepares App connectivity in the respective cloud providers.
- Connectivity - CloudShell creates the physical and virtual network connections for the sandbox's resources and Apps, and powers on the App VMs.
- Configuration - If any of the sandbox's Apps have configuration management operations that need to be run, CloudShell runs them in this stage.
If any resource is unavailable for the scheduled time slot, the Conflicts dialog box is displayed, proposing an alternative time slot, as described in Dealing with conflicts.
The new sandbox is displayed in Diagram view with a blue Sandbox label at the top of the canvas and a green Active icon in the toolbar:

Note: For persistent blueprints, the blue Sandbox label is replaced with a Persistent Environment label.
If you have a license for the Save and Restore paid add-on, you will see a Save Sandbox button. For more information, see the Sandbox Save and Restore Overview.
-
Request approval to reserve a blueprint
Some blueprints require a moderator's approval. This usually applies to high-cost blueprints or those using critical infrastructure. Such blueprints have a Request button instead of the traditional Reserve one. For details, see Blueprint Approval Policy.
Note: Admins and blueprint owners have full permissions on their blueprints and can therefore reserve their approval blueprints without going through the approval process.
To request approval:
-
In the Blueprint Catalog, click the blueprint's Request button.

The Request Approval dialog box is displayed.
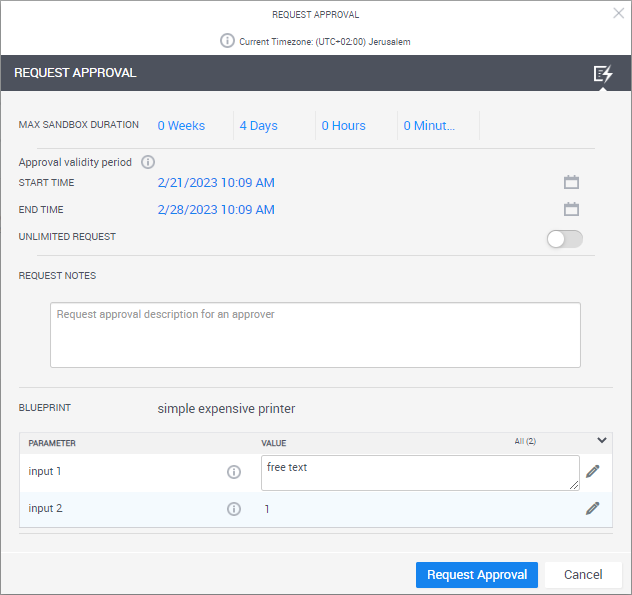
-
Fill in the details. The Approval Validity period defines the time frame in which you plan to create the sandbox, and the Max Sandbox Duration defines the maximum period of the sandbox to be created. Enable Unlimited Request to set a validity period with no end time.
Notes:
- Once the request is approved, you will be able to start the sandbox at any time within the period as long as the sandbox also ends within the alloted time frame.
- The approval applies to a single sandbox reservation. In other words, you cannot start the sandbox, end it and start a new one on the same approval.
- Optionally enter Notes relating to the request.
- If the blueprint has published inputs, specify their values.
-
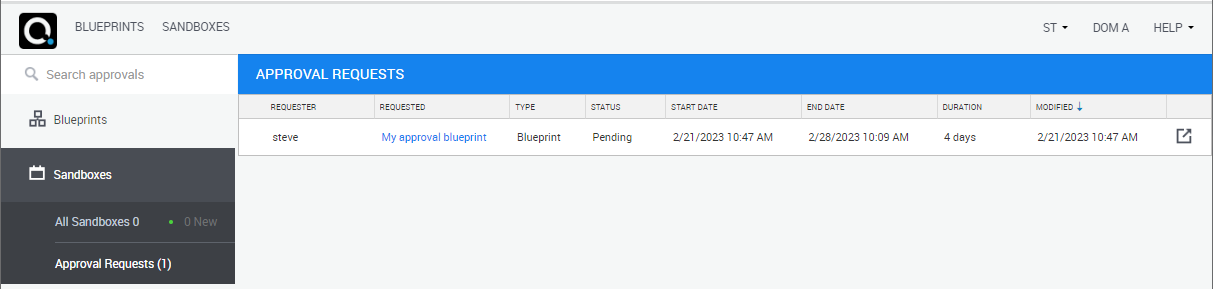
Click Request Approval.
An approval request is logged in the Approval Requests page, and a notification email is sent to the blueprint's approvers.