Getting Started with Packaging API
Prerequisites
- Python 3 (version 3.6 and above)
- .NET Framework 4.7
- .NET 5 Runtime (on Windows Execution Servers that will be used for packaging API operations)
-
quali_utils.3.3.0.tar.gz: Version 3.3.0 is cross-platform (supported on Windows/Linux) and requires both .NET Framework 4.7 and .NET 5 Runtime to work (Alternatively, you can use version 3.2, which is not cross-platform, and does require .NET 5 Runtime.
pip install <path_to_quali_utils_package>Note: quali_utils.3.3.0 is supported by CloudShell 2022.1 and above. For previous versions, see earlier versions of CloudShell Help.
Installation
- Make sure you have a compatible Python version installed on your machine.
- To download the Python Package Editor that applies to your installed CloudShell version, visit the Python Package Editor Download Page.
-
Do one of the following:
 Windows installation:
-
Run the pip tool to install the package.
 Linux installation:
You can install Packaging API on Linux environments that have .NET 5 Runtime.
 Installation instructions for various Linux environments:
- Ubuntu: Microsoft-us/dotnet/core/install/linux-ubuntu
- Alpine: https://docs.microsoft.com/en-us/dotnet/core/install/linux-alpine
- Centos: https://docs.microsoft.com/en-us/dotnet/core/install/linux-centos
- Debian: https://docs.microsoft.com/en-us/dotnet/core/install/linux-debian
- Fedora: https://docs.microsoft.com/en-us/dotnet/core/install/linux-fedora
- OpenSUSE: https://docs.microsoft.com/en-us/dotnet/core/install/linux-opensuse
- Red Hat Enterprise Linux: https://docs.microsoft.com/en-us/dotnet/core/install/linux-rhel
- SLES: https://docs.microsoft.com/en-us/dotnet/core/install/linux-sles
Please note that the required version in “dotnet-runtime-5.0” is not as listed in the documentation - “dotnet-runtime-6.0”
 Example: Installing Packaging API on Ubuntu 18.04:
-
Set up Python 3, pip 3:
sudo apt update sudo apt install python3 sudo apt-get -y install python3-pip pip3 install --upgrade pip -
Set up .NET 5 support:
wget https://packages.microsoft.com/config/ubuntu/18.04/packages-microsoft-prod.deb -O packages-microsoft-prod.deb sudo dpkg -i packages-microsoft-prod.deb rm packages-microsoft-prod.deb sudo apt-get update sudo apt-get install -y apt-transport-https sudo apt-get update sudo apt-get install -y dotnet-runtime-5.0 -
Install quali_utils 3.3.0:
- Copy file quali_utils-3.3.0.tar.gz to /tmp folder.
-
Run command:
pip3 install /tmp/quali_utils-3.3.0.tar.gz
-
Validate the installation:
- Copy files package_editor_linux.py and TestPackage.zip to /tmp
-
Run python command:
python3 package_editor_linux.pyOutput:

- Run the
dircommand and see if CreatedPackage2.zip was created. - Make sure the package TestPackage.zip now includes 2 new global inputs in topology.
-
Code Sample
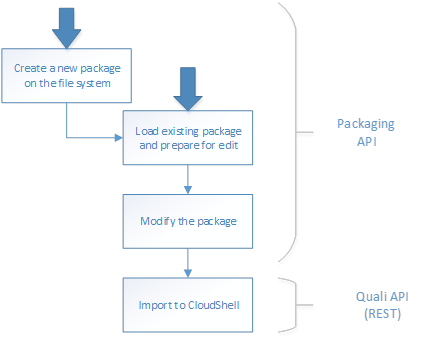
The following code sample provides an example of how to create new blueprints using the API. This example demonstrates how to perform the following flow:

This example uses the “requests” python module.
from quali_utils.quali_packaging import PackageEditorimport requests
#Create a new package in the local file system
p = PackageEditor()
p.create("c:\\myfolder\\mypack.zip")
#Load the package and prepare for edit
p.load("c:\\myfolder\\mypack.zip")
#Edit the package: f.e add new family
p.add_family("Ball", "", ["Game", "3D Shape", "MoreStuff"], False, False, False, False, True)
#Import the package into CloudShell
# 1 – authenticate
r = requests.put('http://localhost:9000/Api/Auth/Login', {"username": "admin", "password": "admin", "domain": "Global"})
authcode = "Basic " + response._content[1:-1]
#2 – Open the package before import
fileobj = open("c:\\p.zip", 'rb')
#3 – Send to CloudShell by calling Import Package REST API
r = requests.post('http://localhost:9000/API/Package/ImportPackage',
headers={"Authorization": authcode},
files={"file": fileobj})
print r._content
print r.ok