Enabling Automation Suites to Use Local Tests
As administrator, you can enable test automation developers to add tests from their local tests folder to jobs in their automation suites. This requires a source control system that will manage the TestShell tests and make them available to CloudShell. To learn how to do this, follow the configuration steps below, or contact your Technical Account Manager.
By default, when creating new CloudShell automation suites, the user can only select shared tests (shared tests and assets are stored in the MS SQL database).
First, let’s try to understand the general flow for working with local tests:
- Each test developer creates and saves tests on their local machine. The developer's local tests folder should be mapped to a source control repository, which stores all the tests.
- A test developer creates or updates a test and pushes the updates to the source control.
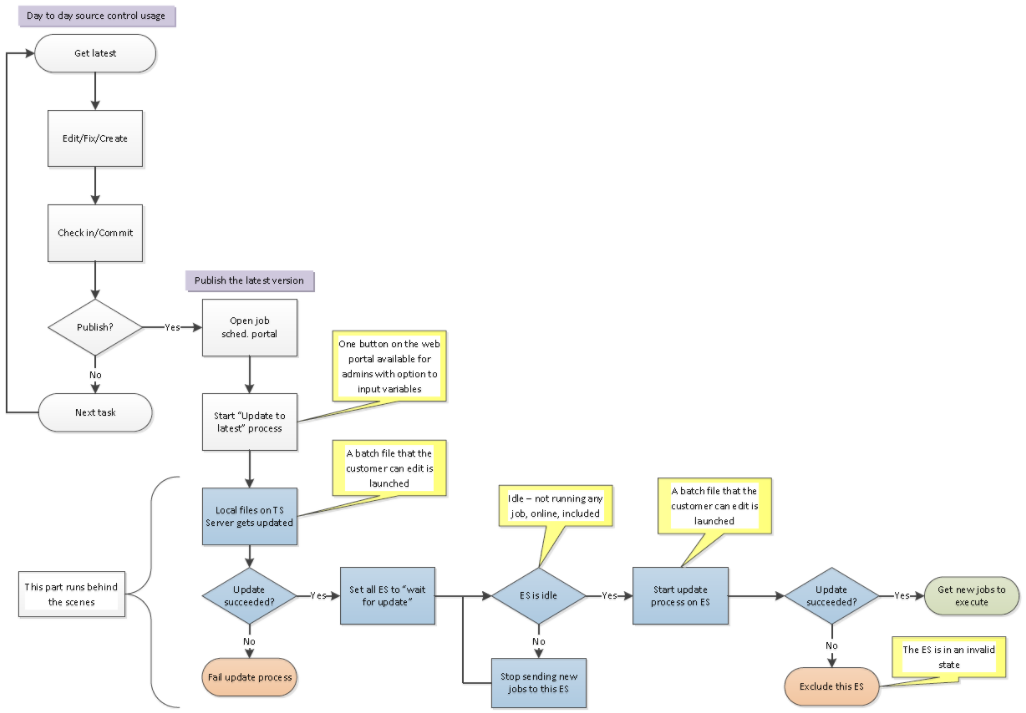
- An admin can then execute an update process to make sure that all the execution server have the latest version of the tests, and that CloudShell Portal displays the latest version as well (changes might include new tests, new functions, new inputs, etc).
Now that we understand the general concept, let's drill down to the technical part:
-
The Job Scheduling dashboard's Update local tests button (available for admins only) runs a batch script file. This file pulls the latest version from the repository to the Quali Server machine (the files on the Quali Server are used for listing only) and allows CloudShell Portal to show which tests exists/get inputs/etc.
- Once the batch file completes:
- For each execution server, if the execution server state is idle (not running any test), the execution server launches a batch file that pulls the latest test versions to the execution server. If the execution server is not idle, the batch file will run when it completes its current executions.
- During this update, the execution server does not run any new job until the batch file ends successfully.
This diagram illustrates the full process:

Note: This only applies to tests residing in the source control repository, so before you start, make sure the local tests folder on the Quali Server is on source control.
For this to work, you need to do the following:
- Configure CloudShell Portal: Enable CloudShell Portal to browse the local tests folder
- Configure Quali Server: Set the local tests folder and batch script that will retrieve the local tests from the source control repository
- Configure each Execution Server that will support local tests: Set the folder that will store the tests from the source control repository
-
Enable the use of Local Assets: Enable the tests to use local assets if any tests require the use of local TestShell assets
Once enabled, CloudShell admins can run the Update Local Tests batch script from the Job Scheduling dashboard to retrieve the local tests from the source control repository.
Configure CloudShell Portal
On the CloudShell Portal, enable admins to browse the local tests folder and set any environment parameters you’d like to pass to the Update Local Tests process.
To configure CloudShell Portal:
- Open the Portal installation directory (C:\Program Files (x86)\QualiSystems\CloudShell\Portal by default) and edit the customer.config file.
-
Add the following key:
<add key="EnableLocalTestBrowsing" value="true"/> -
To insert environment variables into the Update local tests process, add the following key and set the environment parameters, separated by commas:
For example:
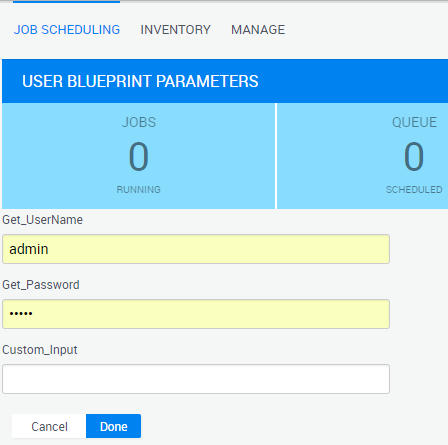
<add key="LocalEnvironmentUserParameters" value="Get_UserName,Get_Password,Custom_Input"/>Whenever the admin runs the Update local tests process, the User Blueprint Parameters page will be displayed, prompting the admin to set the custom parameters to be used by the Upgrade local tests process.

Note: Values of arguments that have the word “password” in the name are displayed as asterisks.
- Restart the CloudShell Portal IIS service.
Configure Quali Server
On the Quali Server machine, the automation developer needs to add the new test from the repository to the Quali Server.
To configure Quali Server:
- On the Quali Server machine, open the Server installation directory (C:\Program Files (x86)\QualiSystems\CloudShell\Server by default) and edit the customer.config file.
-
Copy the following keys and specify the values:
<add key="TestShellServerLocalTestsPath" value="<local-tests-path>"/><add key="LocalEnvironmentGetBatchFilePath" value="<batch-file-path>"/><add key="LocalEnvironmentGetBatchFileOutPutPath" value="<batch-file-output-path>"/>TestShellServerLocalTestsPathSet the local tests folder on the Quali Server that contains the tests to be used. The contents of this folder will be displayed when the test automation developer browses local tests in the Job Scheduling dashboard.
For example:
<add key="TestShellServerLocalTestsPath" value="C:\Local Tests\Tests"/>The folder must be different from the one in use for saved Studio tests (~\Documents\TestShell Files\Tests by default).
LocalEnvironmentGetBatchFilePathSet the path to the batch script that will update the tests from source control when the admin initiates the Update local tests process. For details, see Batch scripts.
Although the Quali Server doesn't run the tests, it needs to expose the latest test versions when adding tests to the automation suite.
For example:
<add key="LocalEnvironmentGetBatchFilePath" value="c:\ScriptsFolder\ScriptName.bat"/>LocalEnvironmentGetBatchFileOutPutPathSet the path to the file that will contain the log files and outputs of the Update local tests process. CloudShell will overwritethe log file every time the admin initiates the process.
For example:
<add key="LocalEnvironmentGetBatchFileOutPutPath" value="C:\Batch Script\Logs\BatchFileOutputLog.txt"/> -
Save and close the file.
-
Restart the Quali Server service.
Configure each Execution Server that will support local tests
On each execution server machine, the developer/admin adds the new test from the repository to the execution server.
Important: Prior to running the Update local tests process, make sure every execution server has a batch file in the specified folder, as the update process will run on all the execution servers in CloudShell and exclude execution servers with a bad or missing batch file. For details, see Batch scripts.
To configure an execution server:
- On each execution server, open the execution server's installation folder (C:\Program Files (x86)\QualiSystems\TestShell\ExecutionServer by default) and edit the customer.config file.
-
Copy the following keys and specify the values:
<add key="TestShellFilesPath" value="<local-tests-path>"/><add key="LocalQsAppDataPath" value="<appdata-folder-path>"/><add key="LocalEnvironmentGetBatchFilePath" value="<batch-file-path>"/><add key="LocalEnvironmentGetBatchFileOutPutPath" value="<batch-file-output-path>"/>TestShellFilesPath Set the path to the folder that will contain the local tests retrieved from the source control repository (~\Documents\TestShell Files\Tests by default).
For example:
<add key="TestShellFilesPath" value="C:\Users\Administrator\Documents\TestShell Files"/>Do not include the local tests folder. For example, if the local tests folder is ~\Documents\TestShell Files\Tests, specify ~\Documents\TestShell Files.
LocalQsAppDataPath Set the path to your QualiSystems AppData folder (C:\ProgramData\QualiSystems\WS_User\AppData by default).
For example:
<add key="LocalQsAppDataPath" value="%PROGRAMDATA%\QualiSystems\WS_User\AppData"/>LocalEnvironmentGetBatchFilePath Set the path to the batch file that will update the tests from source control during the Update local tests process. For details, see Batch scripts.
For example:
<add key="LocalEnvironmentGetBatchFilePath" value="c:\ScriptsFolder\ScriptName.bat"/>LocalEnvironmentGetBatchFileOutPutPath Set the path to the file that will contain the log files and outputs of the Update local tests process. CloudShell will overwrite the log file every time the admin initiates the process.
For example:
<add key="LocalEnvironmentGetBatchFileOutPutPath" value="C:\OutputsOnExecutionServer\BatchFileOutputLog.txt"/> - Save and close the file.
- Restart the TestShell Execution Server service.
Enable the use of Local Assets
Like tests, assets can be local or shared. By default, ‘local tests’ support the use of ‘shared assets’. However, support for local assets needs to be configured to allow local tests to use them.
Local assets are composed of two files: the actual asset file that can be located anywhere on your computer, and a metadata file that points to the asset file. By default, the metadata files are located at C:\ProgramData\QualiSystems\Resources.
This folder contains the assets' folder tree that can be seen in the Asset explorer in TestShell Studio.
In order to use a local asset, the asset's metadata file AND the asset's actual file need to be in the same path on each appropriate execution server as they are on your local machine.
Important: Perform the following procedure on all execution servers you plan on using for test execution.
To use assets in your execution servers:
- In the folder C:\TestShell Files, create a new folder named: Assets Manager.
-
In the Assets Manager folder, create the following two folders:
Assets References: Contains links that TestShell creates between assets and tests (i.e. which asset is being used by which tests)
Actual Files: Contains the asset files
- Edit the customer.config file (C:\Program Files (x86)\QualiSystems\TestShell\Studio by default).
-
Add the following key:
<add key="AssetsPath" value=" C:\TestShell Files\Assets Manager\Assets References"/> -
Update the source control with the Asset Manager folder content.
Before importing a new asset into TestShell Studio, place the actual asset file (DLL\EXE) in the Actual Files directory and then import the new asset from TestShell Studio.
- Next, make sure the assets exist on each execution server. The asset folder path must be exactly the same as defined in the developer machine
- On all execution servers, make sure the batch file retrieves the latest of the Asset Manager folder.
For more information, contact you Technical Account Manager.
Batch scripts
Note: In the Server installation directory, there is a sub-folder called Local Sync Batch Samples where you can find a sample script for TFS. Do not point to this file as this is a sample folder that might be overwritten in future versions.
-
The script file can be a simple file like:
cd %LOCAL_TESTS_PATH%git pull https://%GIT_USER%:%GIT_PASSWORD%@github.com/%GIT_USER%/%GIT_REPO%Where GIT_USER, GIT_PASSWORD and GIT_REPO are parameters defined in the
LocalEnvironmentUserParameters Portalconfiguration key.
-
It is possible to pass or fail the batch script with the following exit codes:
Pass:
Exit 0Failed:
Exit -1
Example for validating git pull and passing / failing based on ErrorLevel after git pull:
REM change directory to TEST path configured in customer.config
cd %LOCAL_TESTS_PATH%
REM going to the parent directory in order to perform git operations
cd..
REM Displaying input params from user (optional to use these params in git commands)
echo param 1: %Param1%
echo param 2: %Param2%
REM: pulling updated code to Repo
git pull
REM validating error code of git pull command
if %ERRORLEVEL% EQU 0 goto passed
:passed
REM command passed
exit 0
REM command failed
exit -1
Example for an Execution Server that is not running any git commands and just needs to pass to avoid being excluded:
exit 0
